


Screen recording on an Apple iPhone or iPad is one of the simplest ways to transform explanations into clear, visual demonstrations. With just a few taps, you can capture your screen as a video and even add narration to guide viewers step by step.
From recording quick tutorials to documenting technical issues, iPhone screen recording has become an essential tool for learners, professionals, and content creators.
So let’s look at how the built-in recorder works, practical ways to use it, and strategies for editing and improving quality. We’ll also cover how to level up your videos with Camtasia, Snagit, and Audiate, whether you’re a complete beginner or seasoned pro.
What screen recording captures
When you start recording, your iPhone saves everything visible on the display: swipes, taps, app interactions, and menus. If you enable the microphone, your narration is included as audio. The recorded video automatically saves in the Photos app for editing or sharing.
So there are minimal limits on what you can capture. You might use screen recordings to:
- Create a short tutorial for coworkers learning a new app.
- Save temporary social media content before it disappears.
- Document a software bug for developers or IT support.
- Capture gameplay or step-by-step processes to share with learners.
Some content, like FaceTime calls, phone calls, or video from streaming services, isn’t captured. But for most workflows, the recorder works seamlessly.
Setting up iPhone screen recording
Screen recording is available natively (no extra apps required) on iOS 11 and up, so it’s supported on nearly all iPhone and iPad models.
To access it, open the Control Center — just swipe down from the top-right corner of your screen. If the screen recording button isn’t there, add it once through Settings > Control Center. From then on, the shortcut will always be available when you swipe into Control Center.
To start recording your iPhone screen:
- Open Control Center.
- Tap the record button (circle with a dot).
- After a three-second countdown, the screen begins recording.
A red bar or bubble appears at the top, indicating recording is active. Tap the indicator to stop recording, or return to the Control Center and hit the record button again.
If you want to record audio too, long-press the button before starting and toggle the microphone on. This is ideal for tutorials, walkthroughs, and training videos where context matters.
Everyday uses for screen recording
Screen recording is a versatile tool that works equally well for all kinds of different personal, educational, and professional needs.
- Personal use: Instead of sending long texts or phone instructions, you can record yourself completing a task and share the video. Helping parents set up new iPhone features or showing a friend how to use an app is much easier when you can demonstrate it visually.
- Educators: Teachers can create mini tutorials, video lectures, or supplemental material for online courses, while students can rewatch lessons asynchronously, boosting retention and engagement. You can also embed screen recordings in presentations or upload them to learning management systems (LMS) for self-paced study.
- Businesses: HR teams can build onboarding videos that walk through internal apps. Managers can record quick walkthroughs for software workflows. And support teams can capture and share bug reports with developers or create troubleshooting videos for customers.
- Content creators: iPhone screen recording is a fast way to generate assets for YouTube videos, TikTok tutorials, or Instagram reels. A few simple edits can transform a raw capture into engaging video content for social media campaigns.
Editing recordings for clarity
Most raw screen recordings include extra taps, pauses, or unwanted notifications. The Photos app offers simple trimming to clean up the start and end. But when you want to turn recordings into polished tutorials or professional training videos, more advanced editing makes a difference.
Need to show your screen?
Skip the downloads. Use Camtasia online to record your screen, camera, and microphone right in your browser for free.
Start Recording
Camtasia (also available as a lighter browser-based free solution via Camtasia Online) is designed for creating professional-quality screen recordings, allowing you to:
- Combine multiple clips into a single tutorial.
- Add transitions or animations for smoother viewing.
- Highlight areas with callouts or zoom effects.
- Use pre-built video templates to maintain consistency across lessons.
Snagit is another great option when you don’t need full video editing. You can pull still images from your recording, annotate them with arrows or text, and create step-by-step guides — perfect for documentation, PowerPoint slides, or training manuals.
For narration, Camtasia Audiate helps you polish audio by removing filler words, background noise, and long pauses. It also generates a transcript, making videos more accessible and easier to repurpose into written content.
If you can edit a doc, you can edit a video
Stop fearing the timeline. Camtasia Audiate transcribes your recording so you can edit your video just by editing the text.
Free Download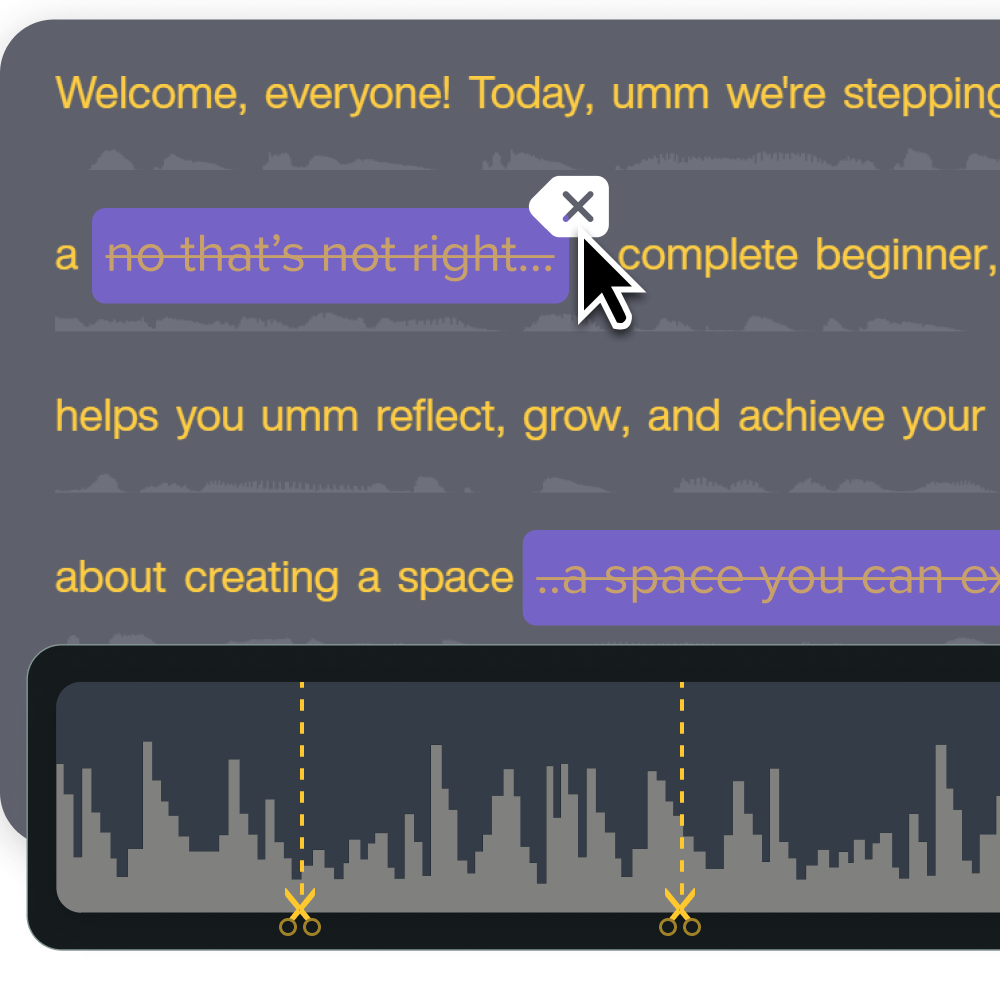
Combine all three tools to elevate iPhone recordings from quick captures to structured, high-quality tutorials.
Tips for better screen recordings
The built-in iPhone screen recording tool is already pretty simple to use, but a few small adjustments can take your video quality to the next level.
- Before recording, tidy your home screen and close unnecessary apps. This keeps the video focused. Turn on Do Not Disturb to block notifications and brighten your display for visibility.
- While recording, move slowly and speak clearly if you’re narrating. Give learners a moment between actions to absorb what they see. Demonstrate one concept at a time instead of jumping through multiple apps or menus. If your video runs long, break it into a few shorter recordings.
- After recording, review your video, trim unnecessary parts, and rename the file with a clear title. If it’s for a training video, use Camtasia to polish it up with captions, intro slides, and transitions. These small touches make all the difference between a raw screencast and a professional video that respects your audience’s time.
Common issues and solutions
Running into problems with iPhone screen recording? It’s usually a quick fix.
- Button missing: Re-add it through Settings > Control Center.
- No audio recording: Long-press the button before recording to turn on the microphone.
- Recording stops early: This usually happens because of limited storage space, a low battery, or incoming calls.
- Black screen in apps: Some apps block recording to protect copyrighted content.
- Low-quality video: Restart your phone, close background apps, and record with a bright display.
Advanced screen recording with TechSmith tools
A quick screen grab for a friend is one thing — you don’t need anything fancy. But professional tutorials, training videos, and educational content are a whole different story. That’s where TechSmith tools come in, transforming your iPhone screen recordings into engaging video content.
- Camtasia: Build structured training videos with annotations, transitions, and even voiceovers. Templates make it easy for beginners, while advanced editing tools help experienced creators produce high-quality video content. You can also embed quizzes to measure retention and add real-time cursor effects for clarity.
- Snagit: Create visual documentation by capturing stills and building step-by-step image guides. Annotate with arrows, text, or highlights to make instructions easier to follow. Great for presentations, PowerPoint, and quick-reference guides.
- Camtasia Audiate: Polish narration automatically by removing filler words, balancing volume, and exporting transcripts. This is particularly useful in higher education and corporate training, where accessibility and clear narration matter.
Together, these tools create an end-to-end workflow. You can screen capture with your iPhone, clean up narration in Audiate, polish the visuals in Camtasia, and pull annotated stills with Snagit. TechSmith makes it simple to create professional tutorials and educational videos that are ready to share across YouTube, LMS platforms, or social media.
Go from screen recording to polished video
A screen recording is just the start. Camtasia’s editor helps you add the callouts, animations, and edits you need to create a truly professional video.
Free Download
Create better iPhone screen recordings
The iPhone screen recording feature is an effective way to help people learn and understand faster. Instead of long explanations, you can show each step visually. For educators, this means learners can replay instructions at their own pace. For professionals, it means clearer training materials and faster onboarding. For content creators, it means tutorials and demos that feel polished and on brand.
The built-in iPhone recorder makes it easy to start. But if you want to create tutorials, educational content, or training videos that stand out, Camtasia, Snagit, and Audiate give you a complete, user-friendly toolkit to take your recordings to the next level.
Ready to create professional tutorials from your iPhone recordings? Get started with TechSmith’s screen recording tools today.
Crystal-clear screen recording
Why settle for blurry screen content? Camtasia Editor’s screen recorder captures everything at up to 4K!
Free Download
Share